Showing posts with label Literacy Ideas. Show all posts

Monday, October 20, 2014

Letter Sticks – A Simple Literacy Manipulative

My youngest son is working on letter recognition and letter sounds, so I made him these easy letter sticks today.

 Craft stick literacy center - write letters on craft stick and then let kids use them to spell words, learn alphabetical order, and more.  Ideas from Raki's Rad Resources

The sticks are super simple – they are just craft sticks that I wrote letters on.  I do uppercase on one side and lowercase on the other, and always write on the front and the back, so there’s no way for kiddos to get confused.  I also make sure that I make at least two for each letter, sometimes more for those Wheel of Fortune letters (R S T L N E).

After I made these, I started thinking of all the ways that these could be used in word work and literacy centers.  So, I thought I’d share a few ideas with you:


1.)  Flash the letter – What’s the name?  What’s the sound?  Just like letter cards, this gives you an easy way to check where students are.  In fact, they can check themselves, and put the ones they know into one cup and the ones they don’t into another.


2.)  Matching uppercase and lowercase – As long as you have at least two of each letter, students can match the uppercase version with the lowercase version easily and increase their understanding of different forms of a letter.

Craft stick literacy center - write letters on craft stick and then let kids use them to spell words, learn alphabetical order, and more.  Ideas from Raki's Rad Resources

3.)  Write out their name – Being able to spell their own name is an important pre-reading skill.  Help kids to spell out their own name by having name cards available to them, and then slowly remove the name cards from the center.


4.)  Spell simple words – First copying words from word wall cards and then creating words of their own, students can use this simple manipulative to build words.  Older kids can use these manipulatives to practice spelling sight words and spelling words.

Craft stick literacy center - write letters on craft stick and then let kids use them to spell words, learn alphabetical order, and more.  Ideas from Raki's Rad Resources

5.)  Quickly change out word family words – Have students create the word family and change out the beginning.  Or have students use these in place of letter cards when playing the Making Words Word Family Centers available at our Teachers Pay Teachers store.


6.)  Work on alphabetical order – Let the kids put the sticks in order from A to Z.  Now can they do it from Z to A?

Craft stick literacy center - write letters on craft stick and then let kids use them to spell words, learn alphabetical order, and more.  Ideas from Raki's Rad Resources

How could you use this simple literacy manipulative?


Heidi Raki of Raki's Rad Resources

Saturday, June 28, 2014

Educational Benefits of a Trip to the Farm

During the summer, most teachers I know spend at least some time planning for the next school year.  My favorite “planning” to do during the summer is field trip planning, because it means I get to tour cool places I’d like to take my students to – often with my own kids in tow.  Here are some of my favorite field trip locations, that can be found in most every community, as well as a list of content connections you can make for your students.  Often as teachers we only include field trips in our science and social studies, but there are lots of reading, writing and math connections that can be made in these locations as well.  I am going to share one type of field trip a week and ideas for making curriculum connections with each field trip.

field trips

 A Trip to the Farm:  Pumpkin patches, apple or berry picking, milking cows, seeing maple trees tapped for syrup, viewing honey bees or just touring a working farm, there are many variations on the the farm field trip, but all are beneficial to students, especially in our current age where many kids have no idea that food comes from anywhere other than the supermarket.

Reading:  Connect to farm stories like Charlotte’s Web, The Day Jimmy’s Boa Ate the Wash or Maple Syrup Season.  Read informational text about the working of a farm. Completing research about the process of producing the goods produced by the farm.

Benefits of a field trip to the farm - curriculum connections for reading, writing, math, science and social studies - from Heidi Raki of Raki's Rad Resources.Writing:  How to writing about the process of producing the goods produced by the farm.  Fiction stories with the farm as the setting.  Chronological narratives of the trip to the farm.

Math:  Bring money and purchase goods from the stand – figuring out the change they would receive ahead of time.  Figure out the elapsed time that occurs from when a baby animal is born to when it starts helping out the farmer (producing milk, eggs, meat etc.)  Create a graph with data collected at the farm, or ask to look at graphs kept by the farmer – how many eggs are collected each day, how much honey is collected each month, how many visitors come each week, etc.

Science:  Look at the life cycles of the plants and animals that live on the farm.  Create a diet chart to compare and contrast what the different animals on the farm eat.  Interview the farmer about how weather patterns affect the farm.  Look at the chemical reactions that happen in producing goods like bread, jelly, cider and cheese.

Social Studies:  Trace the production of a good produced on the farm – from raw materials to sold product.  Look at the laws and policies that affect farmers.  Research trends in farming – organic vs. chemical based; local vs. shipped etc.  Discuss how farming has changed over the past 200 years.  Have students help produce a product – pick berries, milk cows etc. making them a producers rather than a consumer.


To make field trips more educational, I often use graphic organizers and other activities to keep my students focused.  Read more about the specifics in this blog post: Field Trips Aren’t Just For Fun.  Be sure to stop by next week for another Field Trip Curriculum Connection.

What is your best field trip idea?

Heidi Raki of Raki's Rad Resources

Sunday, June 15, 2014

15 Ways to Use Sidewalk Chalk in Your Classroom

15 ways to use side walk chalk as a teaching tool - ideas from Raki's Rad ResourceWhen it’s nice outside, I am always looking for excuses to take my class outside.  A great way to plan an outdoor lesson is to incorporate sidewalk chalk into your lesson.  Here are 15 ways to use sidewalk chalk in your classroom:

1.) Create Your Own Hundreds Chart:  Start students out with the first row of a hundred’s chart and then let students fill in the other numbers.  Once the chart is made, students can jump out number patterns and work on their addition, subtraction and multiplication facts.
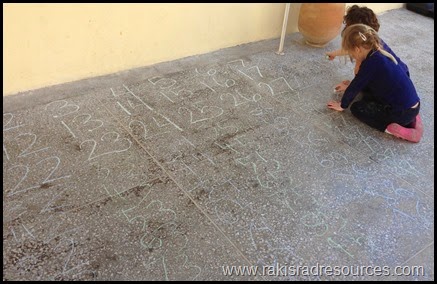
15 ways to use side walk chalk as a teaching tool - create your own hundred's chart - ideas from Raki's Rad Resources

2.)  Reading Buddy Squares: Draw squares on the ground, put 2 books in each square.  Have students pair off and read the two books in their box with their partner – back to back or shoulder to shoulder.  When students have finished the books in one box, they can switch to another box.

3.)  Practice Spelling Words:  Chalk can be another great way for students to work on spelling and sight words.  Have them draw their words big enough to walk on them and they can practice their words two ways!

4.)  Vocabulary Hopscotch:  Have your students review their vocabulary with vocabulary hopscotch.  Draw out a standard hopscotch map.  Write a different vocabulary word in each square.  If students land on a word, they have to give the definition of the word in order to stay in the game.

5.)  Drawing Maps:  Students could create maps of their own, or practice sketching out world maps.  At my school, we created a world map with chalk.  Everyone helped color in oceans and label the continents.  Then we used string to add the Equator and Prime Meridian.  15 ways to use side walk chalk as a teaching tool - Draw a world map - ideas from Raki's Rad Resource

6.)  Make and Jump on Number Lines:  So many math concepts can be covered with number lines – adding, subtracting, multiplying, dividing, decimals, negative numbers etc.  Draw out a number line – have students add whatever numbers fit on the number line.  Then, have students work on equations by actually jumping on the number line.

7.) Jotting Down Unfamiliar Words: Take Sustained Silent Reading outside and give each student a piece of chalk.  Tell them that if they come to a word they don’t know the meaning of, they should jot it down on the sidewalk near them.  At the end of 15 – 20 minutes, write down all of the students’ words on a piece of paper.  Have students look up the words in the dictionary to begin the creation of a “New Words Notebook”. 

8.) Draw Geometrical Figures & Properties:  Give students a specific geometry concept to work on – every student could even work on their own topic (from a random grab bag or differentiation by design).  Have students use the sidewalk chalk to draw out their concept.  This works from simple shapes for younger students to acute angles, parallel lines, line segments, radius and diameter, etc. for older students.

15 ways to use side walk chalk as a teaching tool - work on geometry - ideas from Raki's Rad Resource

9.)  Draw Science Diagrams: Cell diagrams, genetics charts, human body diagrams – anything you can draw on paper can be drawn outside with sidewalk chalk, giving a new, kinesthetic experience to increase memory of the concepts.

10.)  Drawing and Walking Out Timelines:  Give students a real understanding of the amount of time that passed between important events by drawing out your own timelines.  Use one student foot for a set amount of time (10 years, 100 years, 1000 years).  Then add important events from your history lessons.  Finally have students walk “through history” from one event to another.  Great way to point out common misconceptions – like Martin Luther King Jr. being alive during slavery.

11.)  Coordinate Graphing: Sidewalk chalk is a great way to create a coordinate grid that is large enough to walk on.  Students can become the “points” and determine their own coordinate.  Also great for working on reflecting and translating points.

12.) Draw your Character or Setting:  Have students brainstorm ideas for their next story by having them draw out their character or setting outside with sidewalk chalk.  Then take a picture of their drawing and have them keep it handy while they are writing their story.

13.)  Create and Describe a Potion:  Have students create a “potion” by mixing together kitchen ingredients.  Then, have students use sidewalk chalk to write descriptive words (adjectives) and sentences about their potion.

15 ways to use side walk chalk as a teaching tool -describe a magic potion - ideas from Raki's Rad Resource

14.)  To the Races!:  Have students race paper airplanes, cars, balls, marbles, anything that rolls or flies.  Students should use sidewalk chalk to mark where each item ends.  Students can then measure the distance traveled by each item.  Great for allowing students to design their own vehicles!

15.) Create a Student Graph:  Have students create the categories for a survey.  Then, create a “Student Pictograph”, using sidewalk chalk as the axis and students as the “symbols”.


How do you use sidewalk chalk in your classroom?

Heidi Raki of Raki's Rad Resources


Friday, February 21, 2014

ISM Spotlight – Amazing Book Activities

Tismspotlight his year I am the luckiest teacher in the world. I get to teach at the best school ever – International School of Morocco, with some of the best, most creative, teachers ever. Each time I walk into someone else’s classroom, I get inspired and we just seem to spiral great teaching ideas off of each other. It’s a wonderful place to teach, and since we are all collaborating, it’s a wonderful place for our kids to learn – a teacher’s dream, right? I have tried and tried to convince the other teachers to create blogs of their own to spotlight and share some of their amazing ideas, but everyone is super busy. Instead, they have each agreed to let me spotlight some of their ideas right here on Raki’s Rad Resources. So, each Friday night, I will be posting an ISM Spotlight.

This week was Literacy Week at the International School of Morocco.  We spent the week learning about books, languages and how we use each.  Here are some of the things we did:

We started each day out with a whole school read aloud and story analysis poster.

On Monday, we read Green Eggs and Ham and analyzed the characters of Sam I Am and the narrator.  For lunch that day, we ate green eggs and ham!

Using story maps to analyze read alouds with students.   Green eggs and ham

On Tuesday, we read Chicka Chicka Boom Boom and analyzed the poetic elements, like alliteration, assonance and personification.  For snack that day, we had coconut tress made out of coconut cream cookies and apples.

Using story maps to analyze read alouds with students  Coconut tree snack for Chicka Chicka Boom Boom

On Wednesday, we read The Giving Tree and analyzed the characters, setting, problem and solution.  For snack that day, we had a Mad Hatter’s tea party (from Alice and Wonderland) with scones and English tea.  

 Using story maps to analyze read alouds with students  Mad Hatters tea part

On Thursday, we read Cloudy with a Chance of Meatballs and completed a story map with characters, setting, problem, solution, beginning, middle and end.  For lunch that day, we ate rice and meatballs.

 Using story maps to analyze read alouds with students

On Friday, we read Stone Soup and completed a simple story map with characters, setting, problem and solution.  Each child brought in a vegetable and we made stone soup for lunch!

 Using story maps to analyze read alouds with students  stone soup

On Monday, we all came dressed as our favorite book characters.  These three teachers were: Ms. Frizzle, The Coconut Tree and Little Red Riding Hood.

 Book Character Dress up day - Mrs. Frizzle, Coconut Tree, Little Red Riding Hood

Throughout the week, we had parents in to read to children in their native tongue.  Our students heard stories in French, Spanish, Arabic, German, Korean, Swedish, Russian and English.

 Inviting parents to school to read in their home languages.   readaloud

During snack each day, the students created graphs about their name.  They graphed the letters in their first name, the letters in their last name, the number of letters in their first and last name and the number of syllables in their names.

Graphing the letters in your first name for literacy week.

Throughout the week, the older students (Year 3 – Year 6) explored a board of idioms in American English, British English, French and Arabic.  Throughout the week, we stopped to explore and discuss all of these idioms with our students.

 learning about idioms   learning about idioms   

learning about idioms     learning about idioms

Throughout the week, as we transitioned in from recess or lunch we replaced our normal nursery rhyme with reciting the alphabet in English, French and Arabic.  Additionally, the students created the letters of the Latin alphabet with their bodies.

 Creating letters with our bodies for literacy week

What do you do during reading or literacy week at our school?

Heidi Raki of Raki's Rad Resources

Friday, June 1, 2012

Spell & Twist

I LOVE to play board games at home, but I also enjoying using them in my classroom. In addition to encouraging cooperation, turn taking and a variety of other social skills, I find I can often use the games to work on math and literacy skills. So, every Friday, I am going to post a Friday Game Night post, giving tips on how to use a particular board game in your classroom. Here’s this week’s Friday Game Night Tip:

Twister - Part 2 (Literacy)

At this time of the year, it’s important to get kids up and moving and Twister is a great game to do just that. However, you can make Twister educational too! Here are some ways you can use Twister when teaching Literacy Skills. For most of these variations, you will need to add letters to the Twister circles. You can either write the letters right on the circles, or write the letters on index cards and tape the index cards to the circles.

(Management Tip: If you can get your hands on multiple twister boards, you can spread your students around the room on various boards with 3-4 students on a board and use one spinner for all of them. Or, you can die cut colored circles and make a LARGE twister board that will encompass your entire class and tape them to the floor – if you have enough space. Also, when teaching these variations – you should always be the caller for the first few rounds. After students understand the concept, then you can let children take a turn as caller, or even break them into small groups and let this be a fun, active center.)

twister board lettersFor each of these games, pair students up so that there is a “twister” who is actually physically putting hands and feet on the board and playing and a “thinker” who is calling out answers or filling in the sheet.  A team can go “out” by either the twister falling OR the thinker getting the wrong answer.

1. Letter Categories – For this variation, decide on a category before the round begins.  Possible categories could be: animal names, place names, proper nouns,  important people, nouns, verbs, adjectives, etc.  When the “twister” puts their hand or feet on a letter, the “thinker” must call out a word that fits the category, but starts with the letter the twister landed on.  For example, if the category is animal names and the “twister” lands on the letter M, the thinker might call out monkey.twister words - use twister to make words - free download

2. Create a Word – For this variation, thinkers will use the letters landed on by the twisters to create a word – similar to a word scramble.  Feel free to grab this free sheet from Google Docs to use with this variation.

3. Silly Sentences – For this variation, ttwister make a sentence sheet - free downloadhinkers will use the letters landed on by the twisters to create a sentence – each letter will be the first letter of a word in the sentence they create. Feel free to grab this free sheet from Google Docs to use with this variation.

4. Spell & Twist – For this variation, give the thinkers a list of spelling words.  Each time the twister lands on a letter, they can cross that letter off of ONE of the spelling words.  Each word that gets completely crossed off gets that team a point.  The team with the most points when the round ends wins.

I hope some of the ideas will help you use Twister in a new, different way. Find more ways to use board games in your room by clicking HERE. Keep playing games and watching your students learn.


Heidi Raki of Raki's Rad Resources

Friday, May 18, 2012

Literacy Cherries

I LOVE to play board games at home, but I also enjoying using them in my classroom. In addition to encouraging cooperation, turn taking and a variety of other social skills, I find I can often use the games to work on math and literacy skills. So, every Friday, I am going to post a Friday Game Night post, giving tips on how to use a particular board game in your classroom. Here’s this week’s Friday Game Night Tip:

Hi Ho Cherry-O!– Part 2 (Literacy)

I often see Hi Ho Cherry-O played in Preschool and Kindergarten classrooms to work counting, colors and turn taking. Here are some adaptions to use this preschool game in the elementary school classroom, and touch on some literacy standards too! For each adaptation, you will need to write a digit (0-9) on the bottom of each cherry with a fine tipped Sharpie.


1. How Many Words are in Your Sentence – Do you ever struggle trying to get your kids out of those “I like pizza.” 3 word sentences?  Play Hi Ho Cherrios (with the numbered cherries) and have students write one sentence for each cherry they have.  The sentence must have the same number of words as the number on the cherry.  This is also a great time to talk about using sentences of different length within a paragraph – to build up interest.

2. Rhyming Words – Working on rhyming?  Before each round, give students a word.  Then during their turn, they will collect and add up their cherries, however may “points” they earn tells them how many rhyming words they need to come up with for that original word given before the round began. 

3. Syllable Words – Build critical thinking while working on syllables.  Once students have a conceptual understanding of syllables, play Hi Ho Cherrios (with the numbered cherries) and tell students in order to keep the cherry they win, they must come up with a word that has that many syllables.  (ie. If the cherry they win has a 4, they must come up with a 4 syllable words like ‘impossible’).


I hope some of the ideas will help you use Hi Ho Cherry O! in a new, different way. Find more ways to use board games in your room by clicking HERE. Keep playing games and watching your students learn.


Heidi Raki of Raki's Rad Resources