Showing posts with label Teachable Moments. Show all posts

Friday, April 24, 2015

20 Ways to Use Seeds and Plants in the Classroom

Twenty ways to learn about seeds and plants or incorporate seeds and plants into your lessons - everything from growing a garden in soil to hydroponics to exploring seed catalogs. Twenty different ideas for your classroom or homeschool environment brought to you by Raki's Rad Resources.Spring is here. Let’s celebrate by celebrating seeds! Plant units are a big part of Spring. No matter the age of your students, there are things that can be learned from seeds and ways to incorporate seeds into skills and lessons you are already working on. Try incorporating some of these ideas into your plant unit.

 Twenty ways to learn about seeds and plants or incorporate seeds and plants into your lessons - everything from growing a garden in soil to hydroponics to exploring seed catalogs. Twenty different ideas for your classroom or homeschool environment brought to you by Raki's Rad Resources

All Ages

1.) Plant a community garden: Ask each child to bring in a seed packet. If your school has space, plant the seeds outside for all of the school to share in. If your planting space is limited, pick up some cheap pots and build your community garden inside your classroom, in the hallway or wherever else you can find space. By asking students to bring in their own seeds, you will end up with some wonderful plants you may not have thought to plant yourself.

2.) Cook a meal with food grown by students: Too many students aren’t aware of where their food really comes from. Use this opportunity to grow something edible. Microgreens, sprouts or herbs like parsley, cilantro, mint and oregano can all be grown rather quickly and used as part of a meal. If you have a longer time, consider growing lettuce greens, peas, tomatoes, strawberries or peppers. In my experience, kids will eat things they would never have considered eating when they are part of the growing and harvesting process.

3.) Dissect a seed: Cut open a seed and see what’s inside. Look at it under a microscope or hand lens. Explore

4.) Create art with seeds and plants: From seed collages to photography of newly growing plants to leaf rubbings, there are so many ways to create art using seeds and newly growing plants.

Twenty ways to learn about seeds and plants or incorporate seeds and plants into your lessons - everything from growing a garden in soil to hydroponics to exploring seed catalogs. Twenty different ideas for your classroom or homeschool environment brought to you by Raki's Rad Resources

Preschool/Kindergarten

5.) Sort seeds: There are so many different types of seeds out there. From the teeny tiny lettuce seeds to small apple seeds to big chunky pumpkin seeds to large plum pits.  Seeds could be sorted by size of course, but also by color, shape, etc.

6.) Seed Packet memory: Buy two packets of a wide range of seeds. Turn the seed packets face down and play memory. You can also explore seed packets for words or letters or vocabulary words.

7.) Plant seeds in a wet paper towel: Help students see what actually happens when we plant a seed by “planting” seeds in wet paper towels. Put the paper towels into clear plastic baggies and tape them to a window. In a sort time seeds will sprout and you will start to see roots and stems.

8.) Draw pictures of planted seeds: Whether you plant seeds in a paper towel, a cup or the ground, this is a great time to let students document the changes of their plants with drawings.

Twenty ways to learn about seeds and plants or incorporate seeds and plants into your lessons - everything from growing a garden in soil to hydroponics to exploring seed catalogs. Twenty different ideas for your classroom or homeschool environment brought to you by Raki's Rad Resources

Primary Grades

9.) Predict what plants will come from each seed: Some seeds are more obvious – think dried peas or sunflower seeds – but most seeds don’t indicate what plants will grow from them – think lettuce seeds or broccoli seeds. Put seeds into numbered envelopes and let students predict what plants are grown by each type of seed. Then either reveal the results or let students grow their seed and find the answers to their predictions that way.

10.) Seed Packet adjectives: Seed packets and seed catalogs are famous for using descriptive adjectives to try and persuade you to choose their variety of seeds. Let students explore these writings and underline or highlight the adjectives.

11.) Grow sunflowers and track growth through measuring and drawings: Sunflowers grow quickly and get really big, so they are a lot of fun to grow with younger kids. Have all of the students plant sunflowers or plant one new sunflower plant each day to see the visual progression of growth. Either way, let students practice measuring by measuring the stem and drawing the growth they see. If sunflowers aren’t available, corn is another plant that grows tall fast.

12.) Write a story from the point of view of their plant: A great creative writing project is to let students pretend to be their plant and write a story about what happens around them. What would life be like if you couldn’t move around, if you had to make your own food, etc. etc.

Twenty ways to learn about seeds and plants or incorporate seeds and plants into your lessons - everything from growing a garden in soil to hydroponics to exploring seed catalogs. Twenty different ideas for your classroom or homeschool environment brought to you by Raki's Rad Resources

Upper Elementary/Middle School

Great Plant Experiment for intermediate age students from Raki's Rad Resources. 13.) Experiment with the needs of a plant: Rather than simply telling students that the needs of a plant are: air, sun, soil and water, let them experiment with these needs. Have students choose one of the needs and experiment with it by determining some variables. Students can document the changes over the course of time and use their data to create a project. My Great Plant Experiment Project provides you with all of the resources to make this experiment happen.

14.) Price compare seeds using seed catalogs: Like just about anything else, seeds cost different prices when purchased from different venues. Seed catalog companies will send you free catalogs each year. It would be very easy to let students comparison shop seeds from different companies. Great math/science connection!

15.) Create a stop motion animation of the plant growing: Like every living thing, plants grow very slowly. However if we take the same picture each and every day at the same time, we can line them up and see the plants grow. Even better, we can put the pictures into a stop animation video software. Check out this blog post for links to these types of softwares.

16.) Grow bean sprouts or microgreens: Sprouts and microgreens are both very popular (and very expensive) in health stores these days. Both are new plants, which contain a lot of nutrition and both are extremely easy to grow.

To grow sprouts, rinse beans (or grains) and put them into a glass mason jar with cheese cloth or screen over the mouth of the jar. Sit the mason jar near the window. Each day, rinse and drain the beans and replace the jar to it’s place near the window. Repeat for a week or two, or until the sprouts are long enough for your liking. Once they are grown, boil the sprouts until soft, cool and toss with shredded veggies and salad dressing for delicious salad!

To grow  microgreens, put an inch or two of soil into a shallow container. Add plenty of seeds of pretty much any leafy variety (lettuce, spinach, kale, carrots, beets, broccoli, etc.). Water daily. Wait about a week until they are about the length of your finger. Pull and eat. They can be eaten raw, mixed into a salad or used to top a pizza. 

Twenty ways to learn about seeds and plants or incorporate seeds and plants into your lessons - everything from growing a garden in soil to hydroponics to exploring seed catalogs. Twenty different ideas for your classroom or homeschool environment brought to you by Raki's Rad Resources

High School

17.) Research new and old farming methods: Sustainable farming is an important thing for students to learn about. It is not only an important political and social topic in today’s world, but the growing of food is necessary for our survival. Students should be aware of the methods being used to farm. Students could research “conventional” farming methods with the use of chemical fertilizers alongside the “organic” farming methods. Even further, students could compare different organic farming methods. Today’s organic farmers often go back to older, well tried farming methods like using the “three sisters” methods from Native Americans where the beans are planted around the corn, eliminating the needs for supports and the squash is planted in between and it’s leaves are used to block out weeds. Other farmers have developed new, innovative methods of farming like hydroponics where plants are grown in water without soil and gain their nutrients mainly from the fish waste in the water. These topics could be used in a science class, as a current event study in social studies or as the basis for research reading and writing in an English class.

18.) Write a persuasive essay about a piece of the organic farming movement: Persuasive writing is the cornerstone to online writing these days. Students could write an opinion piece for any English, Science or Social Studies class about whether we should have more or less organic farms, which type of organic farming methods should be used or what farm policies we need in place from the government.

19.) Create a plan for a container garden with a proposed timeline and budget: In a Math class, students could plan out a container garden. How many containers would you need? How much soil would be needed to fill the containers? How about fertilizers or compost? Will you need any supports for plants like beans or peas? Do you need to purchase labels for your pots? How long would it take to get a finished product? How much do you expect to get? Would it be enough to cook a meal? Would have extra to sell to others? Gardening can be a real business and students should have time to explore the process and apply their math principles to it.

20.) Grow seeds using hydroponics: I know we think of growing seeds as a childish project, but the project could definitely be stepped up by having students plan out a hydroponic garden, learning how the fish and plants can share nutrients!


How do you incorporate plants into your lesson plans?

Heidi Raki of Raki's Rad Resources

Saturday, June 28, 2014

Educational Benefits of a Trip to the Farm

During the summer, most teachers I know spend at least some time planning for the next school year.  My favorite “planning” to do during the summer is field trip planning, because it means I get to tour cool places I’d like to take my students to – often with my own kids in tow.  Here are some of my favorite field trip locations, that can be found in most every community, as well as a list of content connections you can make for your students.  Often as teachers we only include field trips in our science and social studies, but there are lots of reading, writing and math connections that can be made in these locations as well.  I am going to share one type of field trip a week and ideas for making curriculum connections with each field trip.

field trips

 A Trip to the Farm:  Pumpkin patches, apple or berry picking, milking cows, seeing maple trees tapped for syrup, viewing honey bees or just touring a working farm, there are many variations on the the farm field trip, but all are beneficial to students, especially in our current age where many kids have no idea that food comes from anywhere other than the supermarket.

Reading:  Connect to farm stories like Charlotte’s Web, The Day Jimmy’s Boa Ate the Wash or Maple Syrup Season.  Read informational text about the working of a farm. Completing research about the process of producing the goods produced by the farm.

Benefits of a field trip to the farm - curriculum connections for reading, writing, math, science and social studies - from Heidi Raki of Raki's Rad Resources.Writing:  How to writing about the process of producing the goods produced by the farm.  Fiction stories with the farm as the setting.  Chronological narratives of the trip to the farm.

Math:  Bring money and purchase goods from the stand – figuring out the change they would receive ahead of time.  Figure out the elapsed time that occurs from when a baby animal is born to when it starts helping out the farmer (producing milk, eggs, meat etc.)  Create a graph with data collected at the farm, or ask to look at graphs kept by the farmer – how many eggs are collected each day, how much honey is collected each month, how many visitors come each week, etc.

Science:  Look at the life cycles of the plants and animals that live on the farm.  Create a diet chart to compare and contrast what the different animals on the farm eat.  Interview the farmer about how weather patterns affect the farm.  Look at the chemical reactions that happen in producing goods like bread, jelly, cider and cheese.

Social Studies:  Trace the production of a good produced on the farm – from raw materials to sold product.  Look at the laws and policies that affect farmers.  Research trends in farming – organic vs. chemical based; local vs. shipped etc.  Discuss how farming has changed over the past 200 years.  Have students help produce a product – pick berries, milk cows etc. making them a producers rather than a consumer.


To make field trips more educational, I often use graphic organizers and other activities to keep my students focused.  Read more about the specifics in this blog post: Field Trips Aren’t Just For Fun.  Be sure to stop by next week for another Field Trip Curriculum Connection.

What is your best field trip idea?

Heidi Raki of Raki's Rad Resources

Friday, August 16, 2013

What I Did This Summer

Promote experiential learning with the Summer Scavenger Hunt - Free Download from Raki's Rad Resources


Promote experiential learning with the Summer Scavenger Hunt - Free Download from Raki's Rad Resources

This summer, I gave my students homework.  One of the joys of teaching at a small school with multiage classes is that when school starts (in two weeks for me), I will know if my students did their homework.  Here is the homework I gave my students:

1.) An Online Book Report on any book they read this summer. 

2.) A poster and a blog post based on our Summer Scavenger Hunt.

3.) Practicing Math facts using internet games.


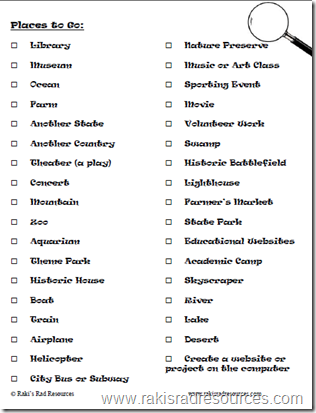
Promote experiential learning with the Summer Scavenger Hunt - Free Download from Raki's Rad ResourcesThe favorite summer homework of my students is usually the Summer Scavenger Hunt, because it encourages them to visit lots of fun places.  In addition, they get to make a poster and a blog post to share their summer with their friends.  It also doesn’t hurt that I offer a No Homework for a Week Pass to whichever students have gone to the most places on the list! 


This summer, my sons and I tried to hit a bunch of places on the list too.  I will be sharing these places with my students as well.  We made it to 20 our of 35.  Here are the places we went to:

1.) Library – South Cobb Library, Mableton, GA, USA

2.) Museum – Portland Children’s Museum, Portland, OR, USAPromote experiential learning with the Summer Scavenger Hunt - Free Download from Raki's Rad Resources

3.) Ocean – San Francisco Bay, San Francisco, CA, USA

Promote experiential learning with the Summer Scavenger Hunt - Free Download from Raki's Rad Resources

4.) Farm – Goat Dairy Farm, Marin County, CA, USA

Promote experiential learning with the Summer Scavenger Hunt - Free Download from Raki's Rad Resources

5.) Another State – We visited over 20 states.

Promote experiential learning with the Summer Scavenger Hunt - Free Download from Raki's Rad Resources

6.) Another Country – We visited the USA and Canada.  (We live in Morocco.)

Promote experiential learning with the Summer Scavenger Hunt - Free Download from Raki's Rad Resources

7.) Concert – Free concert in Mount Tabor Park, Mount Tabor, OR, USA

Promote experiential learning with the Summer Scavenger Hunt - Free Download from Raki's Rad Resources

8.) Mountain – Rocky Mountains, Wyoming, USA; Needles Mountain, South Dakota, USA

Promote experiential learning with the Summer Scavenger Hunt - Free Download from Raki's Rad Resources

9.) Aquarium – Bay Aquarium, San Francisco, CA, USA

Promote experiential learning with the Summer Scavenger Hunt - Free Download from Raki's Rad Resources

10.) Historic House – Angel Island Immigration Center and Army Base – San Francisco, CA, USA

11.) Boat – Paddle Boating, San Francisco Bay, CA, USA; Ferry Boats – Angel Island, San Francisco Bay, USA and 1,000 Islands, New York, USA

Promote experiential learning with the Summer Scavenger Hunt - Free Download from Raki's Rad Resources Promote experiential learning with the Summer Scavenger Hunt - Free Download from Raki's Rad Resources

12.) Airplane – 3 planes back and forth between USA and Morocco

13.) Nature Preserve – Yellowstone National Park, WY, USA

Promote experiential learning with the Summer Scavenger Hunt - Free Download from Raki's Rad Resources

14.) Movie – Free Movie in the Park – Jack the Giant Slayer – Portland, OR, USA

15.) State Park – Grand Canyon National Park, AZ, USA; Mount Rushmore National Park, SD, USA; Yellowstone National Park, WY, USA; Mount Tabor, OR, USA

 Promote experiential learning with the Summer Scavenger Hunt - Free Download from Raki's Rad Resources

16.) Educational Websites – time spent on www.raz-kids.com and www.storybird.com

17.) River – Missouri River, Mississippi River and Tennessee River

Promote experiential learning with the Summer Scavenger Hunt - Free Download from Raki's Rad Resources

18.) Lake – Lake Mead, Hoover Dam, AZ, USA

Promote experiential learning with the Summer Scavenger Hunt - Free Download from Raki's Rad Resources 

19.)  Desert – Grants, New Mexico, USA

Promote experiential learning with the Summer Scavenger Hunt - Free Download from Raki's Rad Resources

20.) Historic Home – Boldt Catle, 1,000 Islands, NY, USA

Promote experiential learning with the Summer Scavenger Hunt - Free Download from Raki's Rad Resources

A few other places we visited, which didn’t fit into any of the “categories” are:

Niagara Falls – Buffalo, NY, USA

Promote experiential learning with the Summer Scavenger Hunt - Free Download from Raki's Rad Resources

Mount Rushmore – South Dakota, USA

Promote experiential learning with the Summer Scavenger Hunt - Free Download from Raki's Rad Resources

The Golden Gate Bridge – San Francisco, CA, USA

Promote experiential learning with the Summer Scavenger Hunt - Free Download from Raki's Rad Resources


Notre Dame Basilicia – Montreal, Canada

Promote experiential learning with the Summer Scavenger Hunt - Free Download from Raki's Rad Resources


I know that a lot of people downloaded my Summer Scavenger Hunt at the end of the school year.  If you did, I’d love to hear about how it went in your classroom, please leave us a comment.  If you didn’t, feel free to grab it from Google Docs for FREE, and have your students check off the things they did during the summer.  It would be a great way to get to know your kids and share what they have been up to.

Are you a homeschooling parent?  Why not download the list and do it during the school year?  The items on the list are definitely available year round!

Where did YOU go this summer?

Heidi Raki of Raki's Rad Resources

Monday, August 5, 2013

When Life Hands You Lemons – Teach with Lemonade!

Real life learning with teachable moments at Raki's Rad Resources

This week, we are in California – just outside of San Francisco with my aunt.  My kids are loving helping her watering and caring for her garden, which includes a lemon tree.  One of their favorite activities was helping her make lemonade.  Here are the steps they took, and some guiding questions we asked along the way, to help make this fun activity into a great learning activity too.


Teaching life and school lessons with a simple pitcher of lemonade!  by Raki's Rad ResourcesStep 1: Pick the lemons.  (If you don’t have your own tree, you could always go to a picking farm – check out YouPick.org to find a farm near you.)

Guiding Questions:  How can you tell when a lemon is ripe?  What season does a lemon tree produce fruit in?  How does the lemon tree produce fruit?  Why do you think a lemon tree makes a sour fruit instead of a sweet fruit?  Where does the lemon tree hide it’s seeds?


Teaching life and school lessons with a simple pitcher of lemonade!  by Raki's Rad Resources Step 2: Squeeze the lemons and collect their juice.

Guiding Questions:  How do we measure out two cups of lemon juice?  How many milliliters are equivalent to two cups of lemon juice?  What other measurements are equal to two cups of lemon juice?


Teaching life and school lessons with a simple pitcher of lemonade!  by Raki's Rad Resources Step 3:  Add water and sugar

Guiding Questions:  Why do we dilute the lemon juice with water?  Why do we add sugar?  What would lemonade taste like if we didn’t add sugar?  What would lemonade taste like if we added too much sugar?  Why do we need to stir the lemonade?  Can we take lemonade apart and get juice, water and sugar again?


Teaching life and school lessons with a simple pitcher of lemonade!  by Raki's Rad Resources Step 4: Enjoy your lemonade!

Guiding Questions:  How important is it to taste test your lemonade?  Why do different people like their lemonade with different levels of sweet and sour?  How do our taste buds work?   


If you have time and energy – you may want to try out:

Step 5: Sell your lemonade! 

Guiding Questions: Who would buy your lemonade?  What would you need (besides lemonade) to sell it?  How much would you charge for your lemonade?  How much lemonade would you need to make in order to sell it?


What other questions could you ask your children while making lemonade?

Heidi Raki of Raki's Rad Resources

Monday, July 29, 2013

Make Map Skills Come to Life

Real Life Learning with the teachable moments from Raki's Rad Resources

On the Edmodo Teacher Communities recently, I saw a teacher asking for some creative ways to teach latitude and longitude.  (BTW – If you aren’t a part of the Edmodo Teacher Community Forums, you should stop by, it’s free and there’s a wealth of knowledge and other teachers available for collaboration.)  My suggestion to the activity was Geocaching.  My children (personal, not students) and I have recently started geocaching and they love it! 

Geocaching is a world wide network of treasure hunts.  People from all around the world have hidden “caches”, which are small containers – boxes, tubes, etc. that contain a log book, and often a collection of prizes.  The people who hide the caches then upload the latitude and longitude coordinates into a Geocaching website, where people can log in and find the coordinates to begin their search.

So, how does one go about geocaching, once you have the coordinates?  Well here’s what we do:

1.)  Read the other tips that go with the coordinates, they will give you clues to help you when you arrive at your searching location.

2.)  Enter your coordinates into a GPS device.  We use our regular old Garmin GPS that we use on road trips.  (We did learn that not all GPS devices allow you to enter coordinates though, so check yours ahead of time.)  Many people have GPS apps on their smart phones or tablets – of course that means you MUST have 3G on that same device in order for the device to pick up your coordinates after you have left your house.  If none of these options work for you – there is a website, called XXX, that allows you to enter coordinates and get an address or a map, which you can print out and follow.

3.)  Follow the directions on the GPS until you run out of road.  We have been to a few that are a dead end road, but some aren’t.  You generally have to leave the road and take off by foot to find the final location.

4.)  Once you are at the final location, you have to look around – up, down, etc.  We found one in a whole under a tree, another behind a fence, you get the picture.

5.)  Sign your name on the log book.    We add our location too.  Then, if there are prizes, choose a prize, but be sure to leave something in return.  This trip we have been leaving Moroccan coins behind us.  (I think I’m going to bring a roll of American pennies back to Morocco to spread in Moroccan and European caches.)  There are many types of prizes, toys, post cards, coins etc.

6.)  Go home and log back on to the website to “log your cache” and announce to the world that you have found the cache. 

Geocaching brings geography to life by building real life experiences that kids will remember.  Raki's Rad Resources

So, now you’re thinking, this sounds like fun, but is it really educational?  How are you using it to teach map skills? 

1.)  After we returned from our first cache, I sat my boys down and we did some research on latitude and longitude, using this cool website.  We also do a little more research on how a GPS device can actually find our exact location.  Because they had a real life use for this skill, they were both extremely interested in the information at hand.

2.)  Before starting a cache, we pull our current coordinates, look at the desired coordinates and discuss what direction we are going in.  We also compare two or three caches and decide which one is closer or farther, using only the coordinates.

3.)  You can easily keep a map of your caches, using the latitude and longitude coordinates, and comparing distances.

4.)  After doing a few with a GPS device, give the kids a map version and see if they can find their cache that way.


Geocaches are available worldwide and would make a great field trip experience, but if you can’t manage to take your class off campus for geocaching, why not hide caches around your school campus and allow students to go geocaching right where you are?  Geocaching brings geography to life by building real life experiences that kids will remember.

Heidi Raki of Raki's Rad Resources

Monday, July 15, 2013

Bubble Mania – Use these Questions to Make Playtime Learning Time

Real life learning with the teachable moment from Raki's Rad Resources

10 Questions to Ask kids while playing with bubblesMy kids (personal children, not students – funny how teachers have to clarify that, huh?) are getting spoiled rotten by all of the family that they haven’t seen in two years.  They have had ice cream, gone to concerts, and received tons and tons of gifts, including nerf guns, books, sidewalk chalk, playdough and bubbles.  My dad bought them tons and tons of bubbles, which kept them so busy!

   While I was watching the kids play with the bubbles, I was thinking of all the things you can teach with bubbles.  Here is a list of what I came up with.10 questions to ask kids while playing with bubbles

1.) Solids, liquids and gasses – How does the gas get stuck inside the liquid, making a bubble?  Why doesn’t it come out the other side?

2.)  Shapes – Bubbles are spheres, where else can we find spheres?  How do we find the area, circumference, or volume of a sphere?

3.)  Air Power – The wind takes the bubbles and floats them around – what controls where the bubbles go?

4.)  Imaginative Writing – Where do the bubbles go when they disappear?  What would it be like to float around in a bubble?

5.)  Respiratory System – How do we blow bubbles?  What’s going on in our body that allows us to blow out big bursts of air?

6.)  Scientific Method – Bubble mix will work if we add a little water, but not if we add too much.  How much water would dilute the bubble mix too much to make a bubble?

7.)  Procedural Writing – What are the steps one takes to blow a large bubble?  How are the steps for blowing a soap bubble different than blowing a bubble gum bubble?  How are the steps for blowing a soap bubble the same as blowing a bubble gum bubble?

8.)  Research – What is the largest bubble ever blown?  What is the most bubbles every blown at one time?  What is the largest bubble mix container in the world? 

9.)  Problem Solving – How do we make large bubbles?  How do the bubbles made by different bubble wands compare and contrast?  Can you make different types of bubbles using the same bubble wand?

10.)  Art – What do bubbles look like if you blow them onto different colored papers?  Can you make multicolored bubbles?  How?


As we are thinking about the beginning of the school year, we must not forget that the weather will still be nice, and kids will be disappointed to leave the “fun” at home.  Use some of these questions to build some fun, inquiry based, creative lessons into the beginning of the school year.

Heidi Raki of Raki's Rad Resources

Monday, July 1, 2013

Documenting Travel Learning with Kids

Real life learning with the teachable from Raki's Rad Resources

Traveling with kids increases background knowledge - how do you document that learning?It’s official, my family has embarked on our summer long road trip.  We flew from Morocco (where we live) to the United States last week.  We’re spending the first two weeks visiting with our friends and family in Georgia, but this Sunday, we will leave on a 5 week trip around the United States.  Our first stop will be Buffalo, followed by Montreal, Chicago, Mount Rushmore, Yellowstone National Park, Portland, San Francisco, the Grand Canyon, Las Cruces, Dallas and back to Georgia for a week before we head back to Morocco.  Here is a Google map itinerary we have created for our trip:


View Summer 2013 USA Trip in a larger map


While we travel, my children, aged 5 and 9 will be documenting what they have learned.  (Our 2 year old will just be along with for the ride!)  My 5 year old is documenting his learning in a travel journal.  We purchased a travel journal for him on our trip to Ireland in December.  Each trip he collects pamphlets and pictures and tapes them into his travel journal.  Then, he writes a sentence or two to go with whatever he learned or saw.When traveling with children, have them document their learning in a travel journal or a blog.

My older son documents his learning by writing on his blog – Traveling from a Kid’s Point of View.  I require him to write 2 to 3 paragraphs, and he likes to add pictures of our vacations as well. 

Travel blogging with kids

Free summer scavenger hunt activities to do with kidsAs a parent, I love to work on writing skills and talk about content connections with my children while we travel.  As a teacher, I love for kids to write about their travels because it keeps them thinking about their thoughts.  This metacognition decreases the “summer slide”.  The students in my class are visiting places based on their summer scavenger hunt and then writing blog posts on their edublogs about the places they have visited.  (Feel free to download my summer scavenger hunt for free from Google Docs.)  Kids don’t have to travel far to learn something.  Small day trips make great entries into travel journals!

How have you documented travel learning with your children or students?


Heidi Raki of Raki's Rad Resources