Showing posts with label Homeschool Activities. Show all posts

Tuesday, January 19, 2016

Show and Tell Time!


It’s show and tell time! Stephanie at Forever in 5th Grade is hosting a monthly show and tell link up where lots of bloggers get together to show you what’s going on in their life or their classroom. Since I lhave left the classroom to homeschool my children while we travel in my RV, I thought that this month I would start by showing your what a school day looks like for me right now. For more about the RV journey, feel free to visit my other blog – RVing with the Rakis.


Show and tell time - what does homeschooling in an RV really look like? Find out in this blog post by Heidi Raki of Raki's Rad Resouces and RVing with the Rakis.


Each day we work in English, French and Arabic. The French and Arabic we do mainly follows the curriculum from Morocco, but in English we have the luxury to follow our own interests. Here’s what each of my kiddos is up to right now:
Show and tell time - what does homeschooling in an RV really look like? Find out in this blog post by Heidi Raki of Raki's Rad Resouces and RVing with the Rakis. Creating an AT family puzzle with the preschooler.

My youngest son is 4 years old. He is the youngest of 3 boys and he really, really wants to read. He knows all of his letter sounds, but is struggling with blending sounds. So I put together my AT family self correcting puzzle for him. While he’s not really reading, this puzzle makes him feel like he is! It’s a great confidence builder and it’s also familiarizing him with the concept of word families. We’re going to add a new puzzle each week this school year. You can download these puzzles from my Teachers Pay Teachers store if you’d like to use them with your kiddos.


Show and tell time - what does homeschooling in an RV really look like? Find out in this blog post by Heidi Raki of Raki's Rad Resouces and RVing with the Rakis. Reading Roald Dahl books with the third grader.
My middle son is 8 years old. One of his biggest Christmas presents this year was a collection of Roald Dahl books. He has always been a reluctant reader. For a long time the only thing I could get him to read was Captain Underpants. Then this year I introduced him to Roald Dahl using Charlie and the Chocolate Factory. He fell in love the Roald Dahl’s quicky sense of humor and now he is reading on his own without being asked! The other day he read for over an hour on his own. We missed a bunch of “book work” but I didn’t care. Seeing him enjoy reading was worth letting other work slip.


Show and tell time - what does homeschooling in an RV really look like? Find out in this blog post by Heidi Raki of Raki's Rad Resouces and RVing with the Rakis. Watching TEDed videos with the sixth grader.
My oldest son is 11 years old. His current favorite thing is to watch educational YouTube videos like TEDed and Crash Course. He has watched so many of them that he is starting to run out of videos that he hasn’t seen. With these videos he has taught himself about world history, the science of different diseases, psychology basics and all kinds of random trivia. I love that he’s interested in learning and he loves that I’m letting him have a lot of screen time. Of course he also loves watching them while laying in bed - the best place to learn! It’s a win, win!


Don’t forget to stop by the Show and Tell Linky to explore more show and tells from other bloggers. Also, don't forget to stop by my Teachers Pay Teachers store Jan 20 & Jan 21 of 2016 to save 20% on everything in my store during the Start Your Year Sale. Use the promo code START16 for an additional 10%.


450 × 300


Sunday, July 19, 2015

Use Portfolios to Wrap Up Your School Year

portfolios work - how I used portfolios to help my homeschooled sons reflect on the year's learning. Raki's Rad Resources

This school year my “class” consisted of only three students – my own sons aged 4, 7 and 11. This year I stopped teaching in a classroom in exchange for an “alternative lifestyle”. My family bought an RV and we are traveling around the United States and homeschooling our boys in the process. You can learn more about what we’re up to at our family blog – RVing with the Rakis.

Even though I haven’t had a full class, I have had my hands full! However, seeing what my kids learned this year has been worth every minute. We have been working on a “year round schedule”, taking five weeks off at Christmas, three weeks off at Easter and so we have just this week finished for the year. Now we will be taking seven weeks off to relax and enjoy our summer.

During the last few weeks, the older two boys worked on building online portfolios of their growth and learning for this school year. Here are the results of their weeks of work:

Click here to open this binder in a new window.


Click here to open this binder in a new window.


No matter the size of your class or the age of your students, giving your students the chance to reflect on their own learning and growth each year is beneficial to them as students and to you as a teacher.

signature

Friday, April 24, 2015

20 Ways to Use Seeds and Plants in the Classroom

Twenty ways to learn about seeds and plants or incorporate seeds and plants into your lessons - everything from growing a garden in soil to hydroponics to exploring seed catalogs. Twenty different ideas for your classroom or homeschool environment brought to you by Raki's Rad Resources.Spring is here. Let’s celebrate by celebrating seeds! Plant units are a big part of Spring. No matter the age of your students, there are things that can be learned from seeds and ways to incorporate seeds into skills and lessons you are already working on. Try incorporating some of these ideas into your plant unit.

 Twenty ways to learn about seeds and plants or incorporate seeds and plants into your lessons - everything from growing a garden in soil to hydroponics to exploring seed catalogs. Twenty different ideas for your classroom or homeschool environment brought to you by Raki's Rad Resources

All Ages

1.) Plant a community garden: Ask each child to bring in a seed packet. If your school has space, plant the seeds outside for all of the school to share in. If your planting space is limited, pick up some cheap pots and build your community garden inside your classroom, in the hallway or wherever else you can find space. By asking students to bring in their own seeds, you will end up with some wonderful plants you may not have thought to plant yourself.

2.) Cook a meal with food grown by students: Too many students aren’t aware of where their food really comes from. Use this opportunity to grow something edible. Microgreens, sprouts or herbs like parsley, cilantro, mint and oregano can all be grown rather quickly and used as part of a meal. If you have a longer time, consider growing lettuce greens, peas, tomatoes, strawberries or peppers. In my experience, kids will eat things they would never have considered eating when they are part of the growing and harvesting process.

3.) Dissect a seed: Cut open a seed and see what’s inside. Look at it under a microscope or hand lens. Explore

4.) Create art with seeds and plants: From seed collages to photography of newly growing plants to leaf rubbings, there are so many ways to create art using seeds and newly growing plants.

Twenty ways to learn about seeds and plants or incorporate seeds and plants into your lessons - everything from growing a garden in soil to hydroponics to exploring seed catalogs. Twenty different ideas for your classroom or homeschool environment brought to you by Raki's Rad Resources

Preschool/Kindergarten

5.) Sort seeds: There are so many different types of seeds out there. From the teeny tiny lettuce seeds to small apple seeds to big chunky pumpkin seeds to large plum pits.  Seeds could be sorted by size of course, but also by color, shape, etc.

6.) Seed Packet memory: Buy two packets of a wide range of seeds. Turn the seed packets face down and play memory. You can also explore seed packets for words or letters or vocabulary words.

7.) Plant seeds in a wet paper towel: Help students see what actually happens when we plant a seed by “planting” seeds in wet paper towels. Put the paper towels into clear plastic baggies and tape them to a window. In a sort time seeds will sprout and you will start to see roots and stems.

8.) Draw pictures of planted seeds: Whether you plant seeds in a paper towel, a cup or the ground, this is a great time to let students document the changes of their plants with drawings.

Twenty ways to learn about seeds and plants or incorporate seeds and plants into your lessons - everything from growing a garden in soil to hydroponics to exploring seed catalogs. Twenty different ideas for your classroom or homeschool environment brought to you by Raki's Rad Resources

Primary Grades

9.) Predict what plants will come from each seed: Some seeds are more obvious – think dried peas or sunflower seeds – but most seeds don’t indicate what plants will grow from them – think lettuce seeds or broccoli seeds. Put seeds into numbered envelopes and let students predict what plants are grown by each type of seed. Then either reveal the results or let students grow their seed and find the answers to their predictions that way.

10.) Seed Packet adjectives: Seed packets and seed catalogs are famous for using descriptive adjectives to try and persuade you to choose their variety of seeds. Let students explore these writings and underline or highlight the adjectives.

11.) Grow sunflowers and track growth through measuring and drawings: Sunflowers grow quickly and get really big, so they are a lot of fun to grow with younger kids. Have all of the students plant sunflowers or plant one new sunflower plant each day to see the visual progression of growth. Either way, let students practice measuring by measuring the stem and drawing the growth they see. If sunflowers aren’t available, corn is another plant that grows tall fast.

12.) Write a story from the point of view of their plant: A great creative writing project is to let students pretend to be their plant and write a story about what happens around them. What would life be like if you couldn’t move around, if you had to make your own food, etc. etc.

Twenty ways to learn about seeds and plants or incorporate seeds and plants into your lessons - everything from growing a garden in soil to hydroponics to exploring seed catalogs. Twenty different ideas for your classroom or homeschool environment brought to you by Raki's Rad Resources

Upper Elementary/Middle School

Great Plant Experiment for intermediate age students from Raki's Rad Resources. 13.) Experiment with the needs of a plant: Rather than simply telling students that the needs of a plant are: air, sun, soil and water, let them experiment with these needs. Have students choose one of the needs and experiment with it by determining some variables. Students can document the changes over the course of time and use their data to create a project. My Great Plant Experiment Project provides you with all of the resources to make this experiment happen.

14.) Price compare seeds using seed catalogs: Like just about anything else, seeds cost different prices when purchased from different venues. Seed catalog companies will send you free catalogs each year. It would be very easy to let students comparison shop seeds from different companies. Great math/science connection!

15.) Create a stop motion animation of the plant growing: Like every living thing, plants grow very slowly. However if we take the same picture each and every day at the same time, we can line them up and see the plants grow. Even better, we can put the pictures into a stop animation video software. Check out this blog post for links to these types of softwares.

16.) Grow bean sprouts or microgreens: Sprouts and microgreens are both very popular (and very expensive) in health stores these days. Both are new plants, which contain a lot of nutrition and both are extremely easy to grow.

To grow sprouts, rinse beans (or grains) and put them into a glass mason jar with cheese cloth or screen over the mouth of the jar. Sit the mason jar near the window. Each day, rinse and drain the beans and replace the jar to it’s place near the window. Repeat for a week or two, or until the sprouts are long enough for your liking. Once they are grown, boil the sprouts until soft, cool and toss with shredded veggies and salad dressing for delicious salad!

To grow  microgreens, put an inch or two of soil into a shallow container. Add plenty of seeds of pretty much any leafy variety (lettuce, spinach, kale, carrots, beets, broccoli, etc.). Water daily. Wait about a week until they are about the length of your finger. Pull and eat. They can be eaten raw, mixed into a salad or used to top a pizza. 

Twenty ways to learn about seeds and plants or incorporate seeds and plants into your lessons - everything from growing a garden in soil to hydroponics to exploring seed catalogs. Twenty different ideas for your classroom or homeschool environment brought to you by Raki's Rad Resources

High School

17.) Research new and old farming methods: Sustainable farming is an important thing for students to learn about. It is not only an important political and social topic in today’s world, but the growing of food is necessary for our survival. Students should be aware of the methods being used to farm. Students could research “conventional” farming methods with the use of chemical fertilizers alongside the “organic” farming methods. Even further, students could compare different organic farming methods. Today’s organic farmers often go back to older, well tried farming methods like using the “three sisters” methods from Native Americans where the beans are planted around the corn, eliminating the needs for supports and the squash is planted in between and it’s leaves are used to block out weeds. Other farmers have developed new, innovative methods of farming like hydroponics where plants are grown in water without soil and gain their nutrients mainly from the fish waste in the water. These topics could be used in a science class, as a current event study in social studies or as the basis for research reading and writing in an English class.

18.) Write a persuasive essay about a piece of the organic farming movement: Persuasive writing is the cornerstone to online writing these days. Students could write an opinion piece for any English, Science or Social Studies class about whether we should have more or less organic farms, which type of organic farming methods should be used or what farm policies we need in place from the government.

19.) Create a plan for a container garden with a proposed timeline and budget: In a Math class, students could plan out a container garden. How many containers would you need? How much soil would be needed to fill the containers? How about fertilizers or compost? Will you need any supports for plants like beans or peas? Do you need to purchase labels for your pots? How long would it take to get a finished product? How much do you expect to get? Would it be enough to cook a meal? Would have extra to sell to others? Gardening can be a real business and students should have time to explore the process and apply their math principles to it.

20.) Grow seeds using hydroponics: I know we think of growing seeds as a childish project, but the project could definitely be stepped up by having students plan out a hydroponic garden, learning how the fish and plants can share nutrients!


How do you incorporate plants into your lesson plans?

Heidi Raki of Raki's Rad Resources

Thursday, December 18, 2014

Student Interest Project Website – DIY.org

For two years, I was the Technology Specialist at a school in Georgia. During that time, I amassed a large collection of websites that I use with my students. You can download my E-Book of Websites for the Elementary Classroom for free from Teachers Pay Teachers or Smashwords, or, you can check back here each week for the website suggestion.

Use DIY to increase student led learning and encourage students to develop their interests into learning experiences.  Suggestion from Raki's Rad Resources.

Looking for some experiential learning activities for your students to work on over the holiday break?  Try out DIY.org.  A friend of mine recently suggested this amazing website to me for my personal children.  She described it as “virtual scouting”, which is pretty accurate.  Kids can work towards earning badges on any variety of topics by submitting photo or video “proof” of activities they complete.

Use DIY to increase student led learning and encourage students to develop their interests into learning experiences.  Suggestion from Raki's Rad Resources

In order to get started, children must have an account linked to an adult account.  This could be left up to individual families or could be created as a teacher account.  Once children have accounts, they explore all the different skills that might interest them, like art, athletics, building, business, hacking or science.  Each skill has different badges available for children to earn.  For example, within the skill of art, you will find badges like actor, painter, leatherworker, papercrafter, photographer or puppeteer.

Use DIY to increase student led learning and encourage students to develop their interests into learning experiences.  Suggestion from Raki's Rad Resources

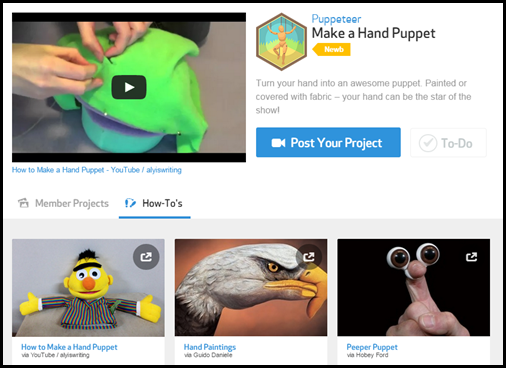
For each badge, there is are 6 – 12 possible challenges.  Children must do 3 or four challenges to earn the badge. For example, if you are working on the badge of puppeteer, you can choose to do things like make a hand puppet, develop a voice for your puppet, make a movie with your puppet or create a marionette.

Use DIY to increase student led learning and encourage students to develop their interests into learning experiences.  Suggestion from Raki's Rad Resources

For each challenge, there are links to photos and videos from different members who have completed this challenge.  Additionally, there are How-To videos from YouTube showcasing professional who have created similar projects.  For example, if you are working on the ‘make a hand puppet’ challenge, there are videos of how to sew a hand puppet and how to paint your hand as a hand puppet.  

Use DIY to increase student led learning and encourage students to develop their interests into learning experiences.  Suggestion from Raki's Rad Resources

Once children complete their challenges, they must upload a photograph or a video of their project.  These photographs or videos are evaluated by someone on staff before they are posted on the website and before the children are given credit for it on their badge.  However, the turn around is quite quick and generally within 24 hours their activity is posted.  Once it is posted, other members can “favorite” their activities and even leave comments.  Students collect their badges virtually, but they can receive real patches in the mail if their adult chooses to order them (for a $4 a patch).

 Use DIY to increase student led learning and encourage students to develop their interests into learning experiences.  Suggestion from Raki's Rad Resources

This website was suggested to me as way to give my children a “scouting” experience while we are full time RVing and moving around the country.  However, it is really an amazing site for anyone looking to make a solid virtual/ hands on connection.  It also allows students to build skills and work together with children around the world.  This website is perfect for homeschoolers, especially unschoolers, but it would also easily be included into standard classrooms.  It would be a great spring board for 20% Time or Genius Hour.  It would also be fabulous for early finishers or indoor recess.  Additionally, it would be great to send home over the holiday break as “homework” along with a reading log or an online book report.  It’s a simple and easy way to keep kids learning and engaged in topics that are interesting to them.

How could you use DIY.org in your classroom?

Heidi Raki of Raki's Rad Resources

Sunday, November 16, 2014

20 Ways to Use Playdough in the Classroom

20 ways to use playdough to increase learning in the classroom - from Raki's Rad Resources

Playdough can be one of the most useful tools in the classroom, but it is often overlooked.  Playdough is cheap to buy and easy to make, and brings out creativity and learning  Here are 20 different ways to use playdough in the classroom:

1.) Letter imprints – Know those letter magnets?  Press them into a ball of clay and you get amazing letter imprints which can be used for a letter recognition center.

20 ways to use playdough to increase learning in the classroom - from Raki's Rad Resources

2.) Counting balls – How many small balls can you make?  Can you count them?  Can you put them into groups of 10 so we can count by tens?

3.) Letter formation- Roll the playdough into the shape of alphabet letters, or numbers.  Or give students a coloring sheet in a page protector and see if they can fill in the letter.  Students can also practice writing words or their name.

20 ways to use playdough to increase learning in the classroom - from Raki's Rad Resources

4.) Shadow sculptures – Create a sculpture.  Place it on a sheet of white paper.  Shine a flashlight onto the sculpture.  Use a pencil to draw around the outside of the shadow.

5.) Create collaborative sculptures – Working together can be one of the most important skills we teach.  Give students a topic or a shape and ask them to create that together.

6.) Sculpt beginning, middle and end of a story – After reading or listening to a story, ask students to create a sculpture of the beginning, the middle and the end of the story.20 ways to use playdough to increase learning in the classroom - from Raki's Rad Resources

7.) Have playdough olympics – Perfect for indoor recess.  Have students try to roll playdough balls into small containers or having stacking contests with small balls of playdough.  Have a committee create medals out of playdough.

8.) Measuring snakes – Have students create snakes of different lengths and practice using a ruler to measure how long each snake is.

20 ways to use playdough to increase learning in the classroom - from Raki's Rad Resources

9.) Work on forces – There’s nothing easier to push and pull than playdough.  Work on pushing and pulling with your hands and other items, blocks, marbles, strings, etc.

10.) Create maps – Work on landforms by creating mountains, rivers, lakes and plateaus onto a real or fake country.

11.) Create a scene from a book – After reading a story, have kids sculpt out what they have seen.  This helps them work on setting, as well as visualizing the plot.

12.) Three dimensional shapes – Get a real feel for the faces of three dimensional shapes by creating the faces with playdough.  This kinesthetic strategy will cement in the minds of students the properties of 3-d shapes.

20 ways to use playdough to increase learning in the classroom - from Raki's Rad Resources

13.) Imaginary play – Playdough can be turned into any variety of prop or costumes for imaginary play, from a superhero watch to a magic wand to the pizza we are going to eat for dinner.  The only limits are your students’ imaginations.

14.) Snakes & Donuts – This economics game allows students to explore trading, price, and supply and demand while creating snakes and donuts out of playdough.  Find the specifics of this game in this old blog post.

20 ways to use playdough to increase learning in the classroom - from Raki's Rad Resources

15.)Imprint fossils – Pressing leaves or bones into a piece of playdough is a great way to create a mock up of an imprint fossil. 

16.)  Create number sentences – Addition, subtraction, multiplication and division can all be practiced simply by making balls of playdough and labeling them correctly.

20 ways to use playdough to increase learning in the classroom - from Raki's Rad Resources

17.) Add fractions & mixed numbers – Work on fractions by having students practice creating “wholes” that are the same size and using plastic butter knives to cut the wholes into fractions.  This provides a clear visualization of what is going on when we add fractions.

18.) Visualizing fractions – Take those counting balls and create a fraction of a set or a fraction of a number easily.  Use different colors to make it pop out for students.

20 ways to use playdough to increase learning in the classroom - from Raki's Rad Resources

19.)  Create an animated video – Use an app like Stop Motion Studio, which allows students to use single frame pictures to create an animated videos.  They can use playdough to set the scene and take a picture every time something changes.  At the end, they put their pictures into the app and get a video of the movie.

20.) Create a sculpture of the main character before you begin to write your story.  - While creating the character, students should think about their character and what will happen to it in the story they write.

20 ways to use playdough to increase learning in the classroom - from Raki's Rad Resources

How do you use playdough in your classroom?

Heidi Raki of Raki's Rad Resources

Thursday, October 30, 2014

Food Web Project

This year, my kids are using my Year Long Country Study Project to cover all of their Science and Social Studies standards.  Each child chose a country and they will study that country all year.  Each month, we focus on a different topic.  We spend the first three weeks doing research, watching videos and reading books.  Then during the last week, the kids create a project and a write up which they add to their LiveBinder compilation project.

Last month, we worked on Geography and the kids created maps.  (See the maps they created in the blog post: Salt Maps Solidfy Understanding.)  This month, we worked on Habitats and these kids created food webs:


5th Grade – China Mountain Habitat

china food web

2nd Grade – Russia River/Forest Habitat

food web

Creating these food web projects gave us a chance to reinforce vocabulary like predator, prey, carnivore and herbivore.  The kids also had a chance to talk about where on the food web different types of animals fell.  My 2nd grader told me “I’m glad I’m not a small herbivore.  Look, everything eats the Pika!”  My 5th grader realized that humans are the only predators for some large carnivores.

Heidi Raki of Raki's Rad Resources

Monday, October 20, 2014

Letter Sticks – A Simple Literacy Manipulative

My youngest son is working on letter recognition and letter sounds, so I made him these easy letter sticks today.

 Craft stick literacy center - write letters on craft stick and then let kids use them to spell words, learn alphabetical order, and more.  Ideas from Raki's Rad Resources

The sticks are super simple – they are just craft sticks that I wrote letters on.  I do uppercase on one side and lowercase on the other, and always write on the front and the back, so there’s no way for kiddos to get confused.  I also make sure that I make at least two for each letter, sometimes more for those Wheel of Fortune letters (R S T L N E).

After I made these, I started thinking of all the ways that these could be used in word work and literacy centers.  So, I thought I’d share a few ideas with you:


1.)  Flash the letter – What’s the name?  What’s the sound?  Just like letter cards, this gives you an easy way to check where students are.  In fact, they can check themselves, and put the ones they know into one cup and the ones they don’t into another.


2.)  Matching uppercase and lowercase – As long as you have at least two of each letter, students can match the uppercase version with the lowercase version easily and increase their understanding of different forms of a letter.

Craft stick literacy center - write letters on craft stick and then let kids use them to spell words, learn alphabetical order, and more.  Ideas from Raki's Rad Resources

3.)  Write out their name – Being able to spell their own name is an important pre-reading skill.  Help kids to spell out their own name by having name cards available to them, and then slowly remove the name cards from the center.


4.)  Spell simple words – First copying words from word wall cards and then creating words of their own, students can use this simple manipulative to build words.  Older kids can use these manipulatives to practice spelling sight words and spelling words.

Craft stick literacy center - write letters on craft stick and then let kids use them to spell words, learn alphabetical order, and more.  Ideas from Raki's Rad Resources

5.)  Quickly change out word family words – Have students create the word family and change out the beginning.  Or have students use these in place of letter cards when playing the Making Words Word Family Centers available at our Teachers Pay Teachers store.


6.)  Work on alphabetical order – Let the kids put the sticks in order from A to Z.  Now can they do it from Z to A?

Craft stick literacy center - write letters on craft stick and then let kids use them to spell words, learn alphabetical order, and more.  Ideas from Raki's Rad Resources

How could you use this simple literacy manipulative?


Heidi Raki of Raki's Rad Resources

Saturday, August 23, 2014

This Year’s Homeschool Curriculum

Our homeschool curriculum for world schooling - how we educate our children while we travel around the world in our RV. For the past two years, I taught at a school with multiage classrooms and small class sizes.  This prepared me fully for the “teaching position” I am taking on this year – homeschooling my own children, ages 3, 7 and 10.  For the last few years, my sons have been attending school in French and Arabic in Morocco, so we are homeschooling to help them maintain their languages, even though we have returned to the US to full time RV. 

When I tell people that we are going to homeschool, the first question is generally – what curriculum are you using?  Due to our unique circumstances, I have created a curriculum specifically for my children, with a mixture of my own resources and resources that I purchased when we were in Morocco.

Each week, we will follow a distinct routine, with the kids doing independent learning using a to-do list and me filling in where I see they need help.  Here’s a look at what my 5th grader’s to-do list will look like:

Our homeschool curriculum for world schooling - how we educate our children while we travel around the world in our RV

Listening:  He will complete 6 “listening” activities a week for the first 3 weeks of the month, and then on the 4th week, he will choose his favorite from each language and revise, edit and publish that listening summary to his blog – Traveling From a Kid’s Point of View.  The listening activities are educational videos on a topic of his choice – 2 in each language.  After watching the video, he summarizes what he learned and makes connections in a two to three paragraph write up.  This activity helps him to “immerse” himself into the languages regularly.  It also gives him a chance to work on note taking, summarizing and all of our writing skills, including staying on topic, giving enough details and using good grammar.

 Reading logs can be used in classrooms and homeschool settings alike.  Raki's Rad ResourcesReading:  In addition to 40 minutes of reading in each language (logged on his Weekly Reading Logs), he will complete novel studies in English and Arabic using my Generic Novel Study packet.  In French, he will complete pages in his French “basal type” reading book.  I want him to combine pleasure reading with a more structured approach to reading.  Also, each week he will record himself reading for a one minute “fluency check” – each week in a different language.

Typing:  By this age, his handwriting is pretty much what it’s going to be, so instead of handwriting, he will be practicing his typing – on both an English and Arabic keyboard – using websites that you can find in my Teaching Typing blog post.  My second grader will do handwriting in French and Arabic, but work on typing in English this year. 

Grammar:  While we will be doing a lot of applied grammar in our listening summaries and writing, there are still some grammar rules that need to be introduced in case they don’t come up naturally.  We will be using Daily Language to do this in English and specific grammar books to work on this in French and Arabic.

Writing:  We will be doing writing in two week blocks, with two weeks dedicated to brainstorming, drafting, revising and editing a writing pieces in a specific genre from my Writing Journals.  Each two weeks we will change languages, but stick with one genre for a trimester.  We are starting out with fiction writing and my oldest is excited to write a fantasy story with dragons and elfs!

Math:  In math, we will be introducing new concepts in English with Interactive Notebook pages, and then complete assigned work pages on these topics in all three of their languages.

Memorization:  In Morocco, the boys spent A LOT of time memorizing – poems, articles, Koran passages etc. etc. etc.  While I am not in favor of the amount of memorizing they were doing, I do still think the skill is important, so each week they will choose their own poem or passage to memorize, rotating through the three languages.

Science & Social Studies:  Instead of working on separate science and social studies topics, we have decided to devote ourselves to a year long country study which will cover all of our topics.  My 2nd grader has chosen Russia to study and my 5th grader has chosen China.  Each month, we will have a different focus as we study our countries:

September – Maps & Landforms (Geography)

October – Plants & Animals (Life Science & Ecology)

November – Folk Stories, Religion, Art & Music (Culture)

January – Archeological History (Earth Science/Fossils)

February – Ancient History (History)

March – Modern History (History & Government)

May – Structures & Inventors (Physical Science)

June – Government & Political Relations (Government)

July – Holidays & Food (Culture & Physical Science)

Exploring the environment around you is a great way to learn about science. In addition to our “book learning”, we will be going on lots of field trips – near and far – and exploring the natural world around us.  Recently, we have been watching the growth of a group of ducklings that lives near our current campsite.

For a look at our homeschool schedule or find out more about our RV adventures, check out our sister blog – RVing with the Raki’s.

Sunday, August 17, 2014

Get in Touch with History by Walking Around It

During the summer, most teachers I know spend at least some time planning for the next school year.  My favorite “planning” to do during the summer is field trip planning, because it means I get to tour cool places I’d like to take my students to – often with my own kids in tow.  Here are some of my favorite field trip locations, that can be found in most every community, as well as a list of content connections you can make for your students.  Often as teachers we only include field trips in our science and social studies, but there are lots of reading, writing and math connections that can be made in these locations as well.  I am going to share one type of field trip a week and ideas for making curriculum connections with each field trip.

field trips

Historical Sites: Battlefields, lighthouses, colonial homes, ancient ruins, anything of historical importance can be of great insight to students.  Seeing how things once were helps them to better understand how things once were.  My best historical site field trip had to be the Ancient Roman Ruins at Chellah, which you can read about this old blog post.

Reading: Historical fiction stories come to life when you are able to visit the places where these stories take place.  Newspaper articles – new and old – make for great reading in connection to historical sites, as do “first person accounts” of what went on in these places.  This is a great time to talk about the difference between primary and secondary sources, as well as in comparison with historical fiction based off of these events.

clip_image001Writing:  Once students have experienced the historical site, they can have a chance to write from the point of view of a person who lived or worked at this site.  Students may also write informational – newspaper articles – about the current site, OR about the site as it existed during it’s most important time period.  Taking time to write a descriptive essay that makes someone else feel as if they experienced the same field trip is also a great writing activity for historical field trips.

Math:  Using timelines is a great way to teach elapsed time.  Create a timeline of important events that happened at this location.  Have students create their own word problems based off of this timeline.  For example:  How long was it from when the castle was built until when King X moved in?

Science:  Students can explore the questions:  What materials were used to build this site?  How have they lasted as long as they have?  What types of preservation has been done? Were any archeological techniques used?

Social Studies:  Exploring the history of the area is huge, but students could also explore the time periods when this building was in its peak, the geographical and political elements that led to its creation, the elements that led to the downfall or closing of the site.  Creating a map or timeline of the site could also be beneficial.

To make field trips more educational, I often use graphic organizers and other activities to keep my students focused.  Read more about the specifics in this blog post: Field Trips Aren’t Just For Fun.  Be sure to stop by next week for another Field Trip Curriculum Connection.

What is your best field trip idea?

Heidi Raki of Raki's Rad Resources

Sunday, July 20, 2014

Exploring Nature Field Trip

During the summer, most teachers I know spend at least some time planning for the next school year.  My favorite “planning” to do during the summer is field trip planning, because it means I get to tour cool places I’d like to take my students to – often with my own kids in tow.  Here are some of my favorite field trip locations, that can be found in most every community, as well as a list of content connections you can make for your students.  Often as teachers we only include field trips in our science and social studies, but there are lots of reading, writing and math connections that can be made in these locations as well.  I am going to share one type of field trip a week and ideas for making curriculum connections with each field trip.

field trips - make the most of them with these curriculum connections from Raki's Rad Resources

 Nature Preserve:  Seeing natural animals in their natural habitat – outside of cages – can be highly beneficial for students.  Knowing how animals are helped to stay in their natural habitat can also be completely beneficial.  Plus, there are so many benefits from simple nature hikes.  Find a blog post I wrote about nature hikes here.    

Reading:  Any number of books about animals can be read before and after going to a nature preserve.  Non fiction books about the types of animals you will see.  Fiction stories about animals, like Winnie the Pooh, the Berenstain Bears or Make Way for Ducklings – Talk about the difference between fictional animals and real animals. Read news articles and opinion pieces about nature preserves vs. zoos.

field trips - make the most of them with these curriculum connections from Raki's Rad Resources - trip to a nature preserveWriting:  Write informational essays about the natural habitat of one of the plants or animals that can be found in the nature preserve.  Persuasive writing – which is better nature preserves or zoos?  Write a fiction story from the point of view of one of the animals.

Math:  Measure how wide the trees are; learn about tree rings and calculate the age of a tree stump.  Create a graph of the animals living at the preserve, or of a statistic (like survival rate or release rate).

Science:   Learn about animal habitats, animal life cycles and animal adaptations.  Learn about plant habitats, plant life cycles and plant adaptations.  Discover how to protect the earth.  Explore the interconnectivity of plants, animals and humans.  Look at leaves and try to identify the different types of trees.  Look for “proof” of animal activity – footprints, feathers, droppings.

Social Studies:  Learn about how native people used nature to live.  Research people like Theodore Roosevelt and John Muir, who worked to set aside national parks to preserve nature, and complete a biography projects with the information.  Explore the laws and current trends that affect ecology.  Discuss what happens when gold or oil is found in a place that is protected by law.


To make field trips more educational, I often use graphic organizers and other activities to keep my students focused.  Read more about the specifics in this blog post: Field Trips Aren’t Just For Fun.  Be sure to stop by next week for another Field Trip Curriculum Connection.

What is your best field trip idea?

Heidi Raki of Raki's Rad Resources